Robotics Engineering Courses
Learn robotics, automation, programming and engineering through practical projects.
DIY Obstacle-Avoiding Robot
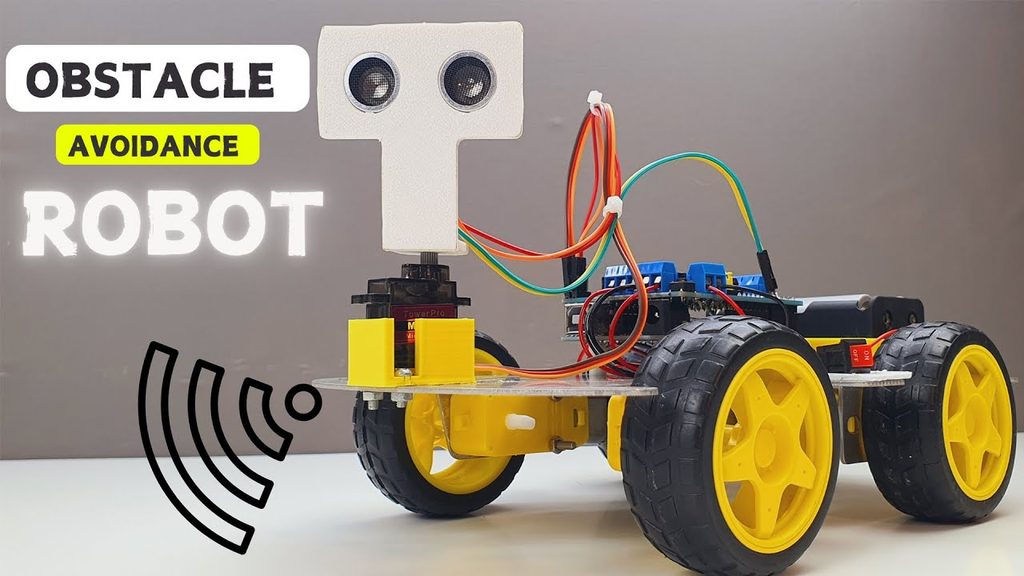
An obstacle-avoiding robot is a simple and exciting DIY robotics project that can move around a room while detecting and avoiding objects in its path. It is an excellent beginner project for learning about sensors, motors, Arduino programming and autonomous robot control.
Explore Robotics EngineeringWhat Is an Obstacle-Avoiding Robot?
An obstacle-avoiding robot is a small autonomous mobile robot designed to detect objects in front of it and change its movement direction automatically. Instead of being controlled continuously by a person, the robot uses a sensor to understand whether its path is clear.
The robot can be built using an Arduino board, ultrasonic distance sensor, two DC gear motors, wheels, a motor driver, a robot chassis and a battery. When the ultrasonic sensor detects an obstacle within a selected distance, the Arduino processes the information and instructs the motors to stop, reverse or turn.
Materials Required
How the Robot Works
The ultrasonic sensor continuously sends and receives ultrasonic waves. From the time taken for the signal to return, the Arduino can estimate the distance to an object. The programmed control system then compares the measured distance with a predefined safety distance.
Simple Building Steps
- Assemble the robot chassis and attach the two DC gear motors.
- Attach the wheels securely to the motor shafts.
- Mount the Arduino board and motor driver on the chassis.
- Place the ultrasonic sensor at the front of the robot so that it has a clear view of the path.
- Connect the motors to the motor driver and connect the motor driver to the Arduino.
- Connect the ultrasonic sensor to suitable Arduino input and output pins.
- Connect the battery or suitable power source according to the electrical requirements of the components.
- Upload an Arduino program that reads the distance and controls the motor direction.
- Place the robot on a clear floor and test its forward movement.
- Introduce a small obstacle and observe whether the robot detects it and changes direction.
Basic Programming Logic
The programming logic can be kept very simple for a beginner. The Arduino repeatedly measures the distance in front of the robot and makes a decision based on the measured value.
- Clear path: Move both motors forward.
- Obstacle detected: Stop the motors.
- Obstacle is close: Move backward briefly.
- Choose a direction: Turn left or right.
- Path becomes clear: Continue forward.
This simple program introduces an important concept in robotics: sensor-based decision making. The robot receives information from its environment and changes its behavior automatically.
What You Can Learn From This Project
Although the project is simple, it introduces several fundamental robotics concepts. You can learn how sensors collect environmental information, how a microcontroller processes that information, and how motor controllers convert software instructions into physical movement.
The project also provides a foundation for more advanced robotics activities, including autonomous navigation, line-following robots, mapping systems, path planning and artificial intelligence-based robot decision making.
Possible Improvements
Once the basic robot works successfully, the project can be upgraded in several ways. You can add additional sensors, improve the turning algorithm, install a servo-mounted ultrasonic sensor, or introduce multiple distance measurements before selecting a direction.
More advanced students can also add Bluetooth or Wi-Fi control, a camera, additional environmental sensors or an AI-based navigation system. These upgrades can transform the basic obstacle-avoiding robot into a more capable autonomous mobile robot.
Safety Tips
- Check all electrical connections before powering the robot.
- Use a suitable power source for the Arduino and motors.
- Keep loose wires away from moving wheels and gears.
- Test the robot initially on a clear, flat surface.
- Do not allow the motors or battery to overheat during testing.
- Disconnect the power source before changing wiring.
Conclusion
The DIY Obstacle-Avoiding Robot is an inexpensive and practical way to start learning robotics. Its basic operation demonstrates how a robot can sense its surroundings, process information and make an automatic movement decision.
By gradually adding sensors, better algorithms and additional control features, this beginner project can become a useful foundation for studying autonomous robots and advanced robotics engineering.